
There's no denying that the JAMstack has taken the traditional web development world by storm and turned our previous tried and true development models on their heads. The JAMstack is not new, per se, but has become an increasingly popular approach to how we write and deploy web applications in the modern developer landscape. With frameworks like Next.js, Nuxt, Gatsby, Hugo, and many others, we as developers have been given the tools to develop entirely serverless applications that run as static web apps in the browser.
Embrace "serverless" here with big air quotes - you're still running on someone's server, and your choice of hosting provider will more than likely dictate just how "serverless" you can be
As Angular developers, we love our framework and everything it provides. Unfortunately, turning your Angular application into a static web app is not as simple as one may like. While Angular Universal does give us an officially supported devtool to turn our Angular apps into statically rendered pages, I've found it a bit on the configure-y side and not as simple to use as I'd like compared to other frameworks like Next.js.
What I'd wished I found earlier before going down my Angular JAMstack journey is Scully, the Angular static site generator I never knew I needed and JAMstack tool that, quite frankly, is just plain fun to use.
JAMstack?
Yep, the JAMstack: JavaScript, APIs, and Markup. There's a thriving community of developers embracing the JAMstack, so defer to them for the nitty gritty details. The JAMstack follows a general artchitecture:
- Markup is pre-rendered at build time and served as static HTML and CSS
- JavaScript still provides all its native interactivity with the browser, while not bogging down the initial rendering of our apps with retrieving JS bundles
- APIs that provide data, processing, and whatever else we need from a backend server
In essence, JAMstack principles align to provide fast, reliable, scalable, and performant web applications for the modern browser.
What this means in practice when you write framework code for say, Next.js, we write our normal React code we'd normally write, with pages being rending in a static context - every element on the page is inspect-able in the browser, which means much more easily indexable by search engines.
What is Scully?
Scully is a tool/framework developed by community members for Angular that turns your Angular application into a statically rendered website, with fully indexable HTML allowing for all the SEO optimization your heart desires while still delivering on the development workflow we Angular developers love about the framework. While I claim to be no Scully expert, I've built a few side project client sites using Scully, while having re-written this exact blog you're reading from Next to Scully.
Scully works on the premise of analyzing your application's routing and compiling a separate build artifact containing all scanned routes as individual index.html pages. While there's a lot more that goes on under the hood and a bit out of my knowledge realm, Scully effectively allows us to turn our Angular SPAs into fully static sites that load quickly to the browser, vastly improve SEO, allows improved search engine indexing, and the list goes on.
The Scully team has great documentation on using the tool, alongside a plethora of build plugins, both from Scully and the community, allowing you to tap into the Scully lifecycle at different points in the build process to customize the generated static files to your need.
Hosting with Netlify
With Scully generating an entirely static version of our application, it becomes trivial to host such files on any static site hosting service. While there's a lot of great services out there, I prefer Netlify as it allows us to tap into Netlify Functions, serving as the A in JAMstack and giving us the ability to build serverless functions that our static Angular applications can call into, performing any work you'd normally do on the server. Using Netlify, not only are we able to host our Angular apps as fully static sites, but we can also build out a mesh of serverless functions that act as a backend-lite for any of our API-like needs! Who said you can't have your cake and eat it too?
Getting started with Scully
This all sounds great, but let's jump into some code to see how we can make our Angular JAMstack dream a reality. Let's kick things off by creating a new Angular application with routing:
ng new scully-netlify-angular-example --routing
Scully utilizes the Angular router to crawl all of our application routes, allowing it to create individual servable HTML files by reading our router configuration. With our code scaffolding in place, let's add some simple components and a few pages:
cd scully-netlify-angular-example
ng g c components/home --skip-tests
ng g c components/ping --skip-tests
ng g c components/data --skip-tests
We're skipping testing for the purposes of this post. With our components in place, let's add them to
our app-routing.module.ts:
app-routing.module.ts
import { NgModule } from '@angular/core';
import { RouterModule, Routes } from '@angular/router';
import { DataComponent, HomeComponent, PingComponent } from '@components';

const routes: Routes = [
    {
        path: '',
        component: HomeComponent,
    },
    {
        path: 'ping',
        component: PingComponent,
    },
    {
        path: 'data',
        component: DataComponent,
    },
];

@NgModule({
    imports: [RouterModule.forRoot(routes)],
    exports: [RouterModule],
})
export class AppRoutingModule {}
With routes in place, let's implement a few services that will help facilitate talking to our Netlify functions (more on those in a bit). Let's implement two services: one for the PingComponent that will consume a PingService to ping the server, and one for DataComponent to offload the responsibility of sending and receiving data from the server.
ng g s services/ping --skip-tests
ng g s services/data --skip-tests
Since we'll be utilizing a bit with Observables, let's implement a service to clean up our streams once a component is destroyed:
ng g s services/unsubscribe --skip-tess
While we're at it, let's make a quick service to help us with our SEO to set page titles, update <meta>s, etc.
ng g s services/document --skip-tests
With our services in place and having no further dependencies (outside the standard Angular library), let's implement their code. First, our UnsubscribeService:
unsubscribe.service.ts
import { Injectable, OnDestroy } from '@angular/core';
import { Subject } from 'rxjs';

@Injectable()
export class UnsubscribeService extends Subject<void> implements OnDestroy {
    ngOnDestroy(): void {
        this.next();
        this.complete();
    }
}
As we can see, our UnsubscribeService is no more than a glorified injectable Subject that emits nothing and simply closes itself on service destruction. This will be helpful to close connections to Observables we're .subscribe()ing to within our components. Next, let's put our PingService code in place:
ping.service.ts
import { HttpClient } from '@angular/common/http';
import { Injectable } from '@angular/core';
import { ServerResponse } from 'types';
import { catchError, delay, map } from 'rxjs/operators';
import { of } from 'rxjs';
import { environment } from '@environment';

@Injectable({
    providedIn: 'root',
})
export class PingService {
    constructor(private http: HttpClient) {}

    pingServer() {
        const baseUrl = `${environment.functionsBaseDomain}${environment.functionsBasePath}`;

        return this.http.get<ServerResponse>(`${baseUrl}/ping`).pipe(
            map((response) => response.message),
            delay(1000),
            catchError((error) => {
                console.log(error);
                return of('Whoops... an error occurred :(');
            }),
        );
    }
}
Next, our DataService:
data.service.ts
import { HttpClient } from '@angular/common/http';
import { Injectable } from '@angular/core';
import { environment } from '@environment';
import { EMPTY } from 'rxjs';
import { catchError, delay, map } from 'rxjs/operators';
import { ServerResponse } from 'types';

@Injectable({
    providedIn: 'root',
})
export class DataService {
    constructor(private http: HttpClient) {}

    sendDataToServer(name: string) {
        const baseUrl = `${environment.functionsBaseDomain}${environment.functionsBasePath}`;

        return this.http
            .post<ServerResponse>(`${baseUrl}/data`, {
                name,
            })
            .pipe(
                delay(1000),
                map((response) => response.message),
                catchError((error) => {
                    console.log(error);
                    return EMPTY;
                }),
            );
    }
}
and finally,
document.service.ts
import { DOCUMENT } from '@angular/common';
import { Inject, Injectable } from '@angular/core';
import { Meta, MetaDefinition } from '@angular/platform-browser';

@Injectable({
    providedIn: 'root',
})
export class DocumentService {
    private readonly rootTitle = 'Scully, Angular, and Netlify';

    constructor(
        @Inject(DOCUMENT) private readonly document: Document,
        private meta: Meta,
    ) {}

    resetTitle(): void {
        this.document.title = this.rootTitle;
        this.meta.updateTag({
            name: 'title',
            content: this.rootTitle,
        });
    }

    updateTitle(pageTitle: string): void {
        this.document.title = `${this.rootTitle} - ${pageTitle}`;
        this.meta.updateTag({
            name: 'title',
            content: pageTitle,
        });
    }

    setMetaTags(tags: MetaDefinition[]) {
        tags.map((t) => {
            const existingTag = this.meta.getTag(t.id ?? '');
            if (!existingTag) {
                this.meta.addTag(t);
            }
        });
    }
}
These services will be responsible for sending HTTP requests to our serverless functions. Let's add some code to our ping component:
ping.component.ts
import { Component, OnInit } from '@angular/core';
import { DocumentService, PingService, UnsubscribeService } from '@services';
import { takeUntil } from 'rxjs/operators';

@Component({
    selector: 'app-ping',
    templateUrl: './ping.component.html',
})
export class PingComponent implements OnInit {
    message = 'pinging the server...';

    constructor(
        private documentService: DocumentService,
        private pingService: PingService,
        private unsubscribe$: UnsubscribeService,
    ) {}

    ngOnInit(): void {
        this.documentService.updateTitle('ping');
        this.documentService.setMetaTags([
            {
                name: 'author',
                content: 'Joey McKenzie',
            },
        ]);

        this.pingService
            .pingServer()
            .pipe(takeUntil(this.unsubscribe$))
            .subscribe(
                (message) =>
                    (this.message = `response from server: ${message}`),
            );
    }
}
and the markup:
ping.component.html
<p>{{ message }}</p>
PingComponent uses PingService to ping the server for a response, then display said response in our browser. Next, data.component.ts:
data.component.ts
import { Component, OnInit } from '@angular/core';
import { DocumentService, DataService, UnsubscribeService } from '@services';
import { finalize, takeUntil } from 'rxjs/operators';

@Component({
    selector: 'app-data',
    templateUrl: './data.component.html',
})
export class DataComponent implements OnInit {
    loading = false;
    response?: string;

    constructor(
        private documentService: DocumentService,
        private dataService: DataService,
        private unsubscribe$: UnsubscribeService,
    ) {}

    ngOnInit(): void {
        this.documentService.updateTitle('data');
    }

    loadData() {
        this.loading = true;

        this.dataService
            .sendDataToServer('Joey')
            .pipe(
                takeUntil(this.unsubscribe$),
                finalize(() => (this.loading = false)),
            )
            .subscribe((response) => (this.response = response));
    }
}
I'm using alias imports in @environment, @services, and @components to make my import paths look tolerable. We do so by adding a paths node to compilerOptions:
tsconfig.json
/* To learn more about this file see: https://angular.io/config/tsconfig. */
{
    // ...other options,
    "compilerOptions"
:
    {
        // ...some more options,
        "paths"
    :
        {
            "@components"
        :
            ["src/app/components/index.ts"],
                "@services"
        :
            ["src/app/services/index.ts"],
                "@environment"
        :
            ["src/environments/environment.ts"]
        }
    }
,
}
Where each index.ts file exports out either services or components in their relative directories and exports our application environment configuration.
With that out of the way, let's wire up our components in the HomeComponent and add some links to navigate between pages:
home.component.ts
import { Component, OnInit } from '@angular/core';
import { DocumentService } from '../../services/document.service';

@Component({
    selector: 'app-home',
    templateUrl: './home.component.html',
})
export class HomeComponent implements OnInit {
    constructor(private documentService: DocumentService) {}

    ngOnInit(): void {
        this.documentService.resetTitle();
    }
}
and with markup,
home.component.html
<div class="flex flex-row space-x-4">
    <a routerLink="/ping">
        <button
            type="button"
            class="inline-flex items-center rounded-md border border-transparent bg-indigo-600 px-3 py-2 text-sm font-medium text-white shadow-sm hover:bg-indigo-700"
        >
            Ping
        </button>
    </a>
    <a routerLink="/data">
        <button
            type="button"
            class="inline-flex items-center rounded-md border border-transparent bg-indigo-600 px-4 py-2 text-sm font-medium text-white shadow-sm hover:bg-indigo-700"
        >
            Data
        </button>
    </a>
</div>
While we're at it, let's go ahead and update app.component.html with some routing:
app.component.html
<router-outlet></router-outlet>
<div class="flex flex-row justify-center pt-12">
    <a routerLink="/">
        <button
            type="button"
            class="inline-flex items-center rounded-md border border-transparent bg-red-500 px-3 py-2 text-sm font-medium text-white shadow-sm hover:bg-red-700"
        >
            Home
        </button>
    </a>
</div>
I'm using Tailwind out of habit, and not required for the purposes of this example by any means. Let's kick off our dev server and we should see after navigating to localhost:4200 a page in our browser with three buttons: ping, data, and home.

With devtools open, if we click the ping button that routes us to the page with our PingComponent, we get an error due to a failed HTTP request to http://localhost:9999/.netlify/functions/ping, and the same happens when we click the data button to navigate to the page with our DataComponent and click the Load data button. Our services are correctly calling out to our serverless functions, but there's one problem: we don't have any functions!
Going serverless with Netlify Functions
If you're familiar with static site hosting services, Netlify is another one of those with much, much more to offer than simple site hosting. One of my favorite features of Netlify is Netlify Functions - Netlify's version of serverless functions that utilize AWS lambda functions behind the scenes to provide an easy way to integrate backend functionality with our statically served web apps. I've found serverless functions helpful in quite a few different ways:
- Sending out emails using email API services
- Integrating with third-party APIs to do some processing for frontend requests
- Serving simple data to be consumed from the frontend
- Heck, even persisting to database based on requests from our frontend applications
Our serverless functions will serve, more or less, as an API-lite for our static served Angular Scully application that will be hosted in Netlify, allowing us to connect our outgoing HTTP calls from the frontend to the backend functions listening for requests. Functions work on the premise of running code at a specified endpoint that receive HTTP events (methods, headers, request body, etc.) and the context of the HTTP request (metadata about the function itself). There's a lot we can customize around the way our functions are detected, served, and ran, but we'll utilize all the defaults for now.
To get started writing functions, let's go ahead and install the Netlify Functions package and the Netlify CLI to help us write and serve our functions:
npm install @netlify/functions
npm install --save-dev netlify-cli # -g if you'd like to install globally
Using the CLI, let's add an npm script in our package.json we can run to start our function server that will detect any code changes we apply while writing our functions, recompile them, and serve them up for our frontend to call into:
{
    // ...other stuff
    "scripts": {
        // ...other scripts
        "functions:serve": "netlify functions:serve"
    }
}
If we run:
npm run functions:serve
we should see a message in our console along the lines of ready to serve, but no functions available. Since we've haven't provided any customized configuration for our functions, the CLI assumes your functions exist under a /netlify/functions folder at the root of your project. Let's implement a /ping GET endpoint using TypeScript that will tap into the functionality provided by the @netlify/functions package to start listening for requests:
netlify/functions/ping.ts
import { Handler } from '@netlify/functions';
import {
    getErrorResponse,
    getHeaders,
    HttpStatus,
    isWhitelistedDomain,
} from '../lib';
import { ServerResponse } from 'types';

const handler: Handler = async (event) => {
    const origin = event.headers.origin ?? '';

    if (!isWhitelistedDomain(origin)) {
        return getErrorResponse(HttpStatus.Forbidden);
    }

    if (event.httpMethod.toLowerCase() !== 'get') {
        return getErrorResponse(HttpStatus.MethodNotAllowed);
    }

    const response: ServerResponse = {
        success: true,
        message: 'pong',
    };

    return {
        statusCode: 200,
        body: JSON.stringify(response),
        headers: getHeaders(origin),
    };
};

export { handler };
I've added some common code that I'll be sharing between functions and have moved that to a lib folder with a single index.ts file:
netlify/lib/index.ts
import { Response } from '@netlify/functions/dist/function/response';
import { ServerResponse } from 'types';

enum HttpStatus {
    Forbidden = '403',
    MethodNotAllowed = '405',
    InternalServerError = '500',
}

const WHITELIST_DOMAINS = [
    '', // Postman doesn't send request from an origin, allow it through (DON'T DO THIS IN PRODUCTION)
    'http://localhost:4200', // Whitelist our Angular dev serve for local development
    'http://localhost:1668', // Whitelist our Scully server for local Scully development
    'https://asdfasdf.netlify.app', // Whitelist our production server deployed to Netlify
];

function getHeaders(origin: string): { [key: string]: string } {
    return {
        'Content-Type': 'application/json',
        'Access-Control-Allow-Origin': origin,
        'Access-Control-Allow-Headers': '*',
    };
}

function isNullOrUndefined(
    objectToValidate?: unknown | null | undefined,
): boolean {
    return objectToValidate === null || objectToValidate === undefined;
}

function isWhitelistedDomain(origin: string): boolean {
    const existingDomain = WHITELIST_DOMAINS.find((d) => d === origin);
    return !isNullOrUndefined(existingDomain);
}

function getErrorResponse(statusCode: HttpStatus): Response {
    let message: string;

    switch (statusCode) {
        case HttpStatus.Forbidden:
            message = 'That method is not allowed for this endpoint.';
            break;
        case HttpStatus.MethodNotAllowed:
            message = 'Domain is forbidden from accessing.';
            break;
        default:
            message = 'An invalid request was made, please try again.';
    }

    return {
        statusCode: +statusCode,
        body: JSON.stringify({
            success: false,
            message,
        } as ServerResponse),
        headers: {
            'Content-Type': 'application/json',
        },
    };
}

export { getErrorResponse, getHeaders, isWhitelistedDomain, HttpStatus };
Nothing too complicated, just a few simple helpers to facilitate validating allowed origins for CORS, some common response generators, and a method to grab some default headers for each response. I've also reused the ServerResponse type under the types.ts file at the root of our project:
export type ServerResponse = {
    message: string;
    success: boolean;
};
Since our project is effectively just a big TypeScript solution (Angular frontend, TS-based serverless functions), we can import any .ts files into our serverless functions, given it runs in the correct context. I wouldn't want to reference any @angular/* imports, for obvious reasons. With our ServerResponse in place, we've created a common statically typed-model between the front and backend of our project!
As you might have guessed, the names and pathing of our function .ts files does matter in our case. There's a few simple rules to adhere to when creating function endpoints
netlify/functions/ping.tswould receive HTTP request matching the route/.netlify/functions/pingnetlify/functions/ping/index.tswould also receive HTTP request matching the route/.netlify/functions/pingnetlify/functions/ping/ping.tswould, again, also receive HTTP request matching the route/.netlify/functions/ping
Now that we have our first function in place, let's go ahead and start our function server:
npm run functions:serve
and in the terminal, we should see a message like the following:
> [email protected] netlify:serve
> netlify functions:serve

◈ Ignored general context env var: LANG (defined in process)
◈ Loaded function ping.
◈ Functions server is listening on 9999
To test out that our functions are working correctly, let's startup Postman and send a request to
http://localhost:9999/.netlify/functions/ping and see what we get:
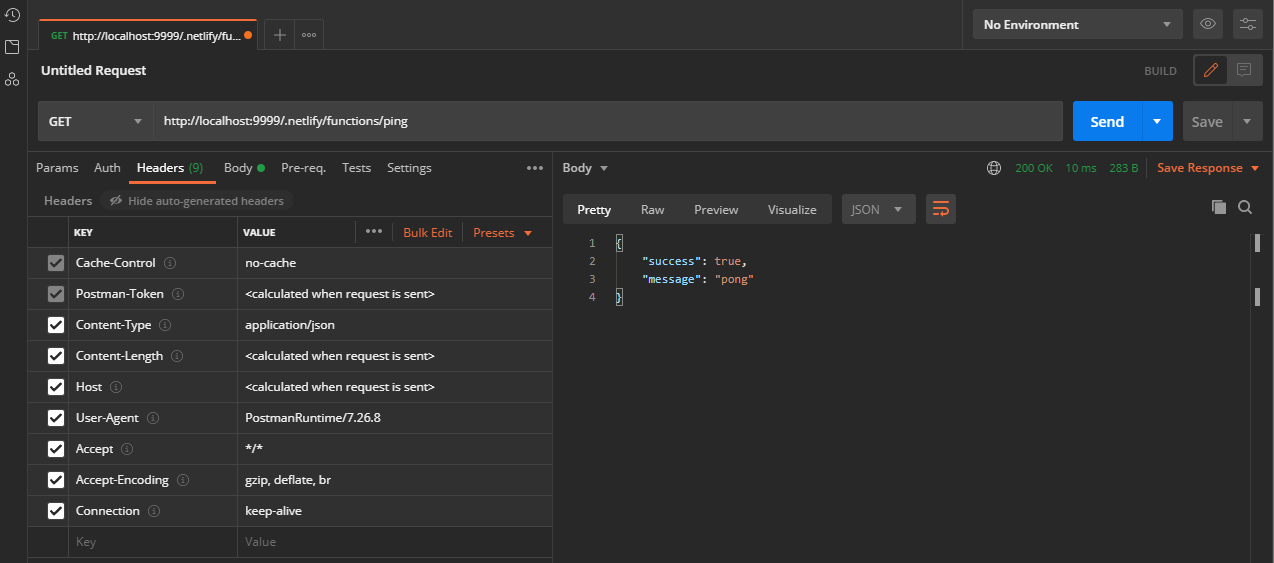
We've got a response! Now that our GET endpoint is working, let's add a POST endpoint that will receive requests with data in the body and return data based on it:
netlify/functions/data/index.ts
import { Handler } from '@netlify/functions';
import {
    getErrorResponse,
    getHeaders,
    HttpStatus,
    isWhitelistedDomain,
} from '../../lib';
import { ServerResponse } from 'types';

const handler: Handler = async (event) => {
    const origin = event.headers.origin ?? '';

    if (!isWhitelistedDomain(origin)) {
        return getErrorResponse(HttpStatus.Forbidden);
    }

    const method = event.httpMethod.toLowerCase();

    if (method !== 'options' && method !== 'post') {
        return getErrorResponse(HttpStatus.MethodNotAllowed);
    }

    /**
     * Because we have a more complex request (JSON being sent over the wire),
     * an options call is made by the Angular HTTP client service to check with our function
     * that it's okay to receive requests in the current context.
     */
    if (method === 'options') {
        return {
            statusCode: 200,
            headers: getHeaders(origin),
        };
    }

    if (event.body) {
        const requestBody: { name: string } = JSON.parse(event.body);

        const response: ServerResponse = {
            success: true,
            message: `Hello ${requestBody.name}!`,
        };

        return {
            statusCode: 200,
            body: JSON.stringify(response),
            headers: getHeaders(origin),
        };
    }

    return getErrorResponse(HttpStatus.InternalServerError);
};

export { handler };
Utilizing our helper methods again, since this is a POST request with more complex request headers (as we can inspect in the network tab attached for us using HttpClient), the client will make a pre-flight OPTIONS call to our function endpoint to essentially ask the question, "hey, this client application wants to make a request to you, is that cool?". We kick out any requests that are not POSTs or OPTIONs (again, normal HTTP framework code would take care of this for you, but we're running a bare bones server here) and accept the POST request body, returning the value of the name attribute given to us in a simple greeting. By adding this function with our server still running, Netlify recognizes a new function was added, and then compiles the output and serves it up under the /.netlify/functions/data endpoint. Let's give it a try with Postman:
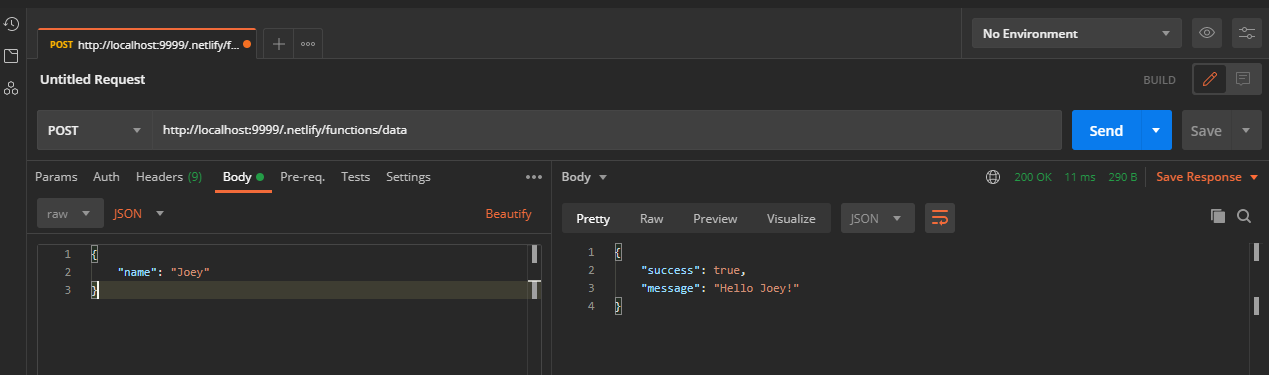
Nice! Now with our functions fully operational and our server running, let's start our Angular server (if it wasn't already running), and watch the magic happen:
We've got ourselves a working solution! So far we've spun up our Angular application that calls into our serverless functions, but we're missing one final piece to truly be considered JAMstack:
Scully.
Adding Scully to the project
To get started, the Scully team has made it dead simple to add static site generation to our Angular apps with a simple schematic. With the terminal open, let's run said schematic:
ng add @scullyio/init
The schematic will add a few Scully dependencies to our project, as well as generate a scully.{{projectName}}. config.ts file with the following:
import { ScullyConfig } from '@scullyio/scully';

/** this loads the default render plugin, remove when switching to something else. */
import '@scullyio/scully-plugin-puppeteer';

export const config: ScullyConfig = {
    projectRoot: './src',
    projectName: 'scully-netlify-angular-example',
    outDir: './dist/static',
    routes: {},
};
To make things easy on us, let's add a few build scripts to our scripts section in our package.json:
{
    "scripts": {
        // ...other scripts
        "build:scully": "cross-env NODE_ENV=scully ng build -c scully && npx scully --scanRoutes",
        "build:production": "cross-env NODE_ENV=production ng build -c production && npx scully --scanRoutes",
        "scully": "npx scully --",
        "scully:serve": "npx scully serve --"
    }
}
I'm using cross-env to assist with Tailwind purging, but as of this writing seems to no longer be needed for Tailwind projects targeting version 3 and up. With our scripts in place, let's go ahead and run the Scully command to generate a static version of our Angular app:
npm run scully
Once the Scully build completes, take a look at your /dist output folder. We should see a dist/static folder with ping and data subdirectories that contain single index.html files. The Scully dev server will serve these static HTML files with all of our Angular code functionality fully intact. Pretty neat, huh? Let's run the dev server:
npm run scully:serve
and once the server is spun up, if we navigate to localhost:1668 in our browser, we should see the same page that is being served by our usual ng serve command! Inspecting the page, we see a fully generated static HTML page, markup and all.
Putting it all together
With our Scully server running, we should still be able to hit our Netlify functions server (assuming it's still running), receiving the same responses we saw from serving the de-Scully'd version of our application. While it may not seem like much, let's take a second to realize what's going on:
- We have a serverless backend stood up ready to receive HTTP requests and do any server related processing with zero backend frameworks in place
- We have a fully static version of our Angular application running in the browser optimized for SEO and indexing by search engines
- To top it off, we're doing all of this within the same repository code!
While we're only scratching the surface of what's possible with Angular, Scully, and Netlify Functions, the DX offered by these tools allows us to quickly develop and ship static websites with rich functionality and data fetching capability, all without implementing an entirely separate API layer in another framework. Our solution is also fully ready to deploy to Netlify, where our serverless functions will kick in, handling requests from our static Angular app deployed to the DSN of our choice. If you're looking to embrace the JAMstack with Angular, take Scully and Netlify Functions for a spin!