
I'm gonna give it to you straight, uncensored, and off the cuff. Building reactive, fault tolerant, pleasant-to-use frontend single page applications in the modern web-based world is not an easy task; building stateful applications, on top of all that, can be the most difficult part of frontend application engineering. Nowadays in the modern enterprise, frontend applications are more complicated than ever - managing user data, interacting with a plethora of APIs, all while allowing users to navigate from page to page and back again carrying what seems like (from an end user's perspective) a history of all their page interactions and application data they've inherently requested just by clicking buttons.
To the untrained eye, this may seem like some form of complicated JavaScript dark magic, and alas, I ensure you for the most part, it is. However, sometime around the rise of React in the mid-2010s, Facebook developed a rather useful design pattern for managing frontend applications in a sane, predictable manner - Flux. Using flux, Facebook (and by proxy, the React development community), pioneered a derivative of the subscriber pattern for the frontend, eventually leading to the development of the well-known Redux JavaScript library for building React applications. With the popularity of Redux and React together, state management adhering to the flux spec came into the mainstream, and a plethora of flux-based libraries, heavily influenced by redux, hit the market (as an Angular reformist, I'm quite partial to NgRx).
With flux in our back pocket, state management on the frontend has become a tried and true design pattern for building rich, interactive applications that are predictable by nature and seemingly eliminate the infinite state machine that was the early days of JS on the web (if you think I'm joking, look at some JS written circa mid-1990's). The question then becomes, what about Blazor? I've put all my eggs in the Blazor basket, and one of the last things holding me back from full immersion was the existence of a flux-based library for the framework. Enter Fluxor, an amazing open source library headed by Peter Morris and the GitHub community, that provides an easy-to-use flux implementation for .NET Core and Blazor. In this series, I'll guide us as we develop a simple flux-based application using Fluxor with Blazor alongside Redux DevTools (available for Chrome/Edge and Firefox), to manage everyone's favorite list - the todos.
What we'll build
For the completed source code of what we'll be building in the first part of this (at least planned, so far) three part series can be found here. With the help of the JSON Placeholder project, we'll be using their " API" (in quotes since it's not really a persistence server, simply just for making dummy calls) to build a simple CRUD application using the todo models from JSON Placeholder.
Getting started
To kick things off, let's go ahead and bootstrap a new Blazor WebAssembly project from your preferred project template
provider. I'll be using Visual Studio throughout this series, but you're more than welcome to use Rider, VS Code, or
just the command line. In Visual Studio, let's go ahead and hit up a File > New Project and select
the Blazor WebAssembly project template. I'll name my project StateManagementWithFluxor, but you're welcome to pick
a name of your choosing. Leaving the defaults, as we don't need any authentication or hosting from an ASP.NET Core
server, let's go ahead and hit Create.
With our project ready to roll within VS, let's add a package reference to Fluxor.Blazor.Web
and Fluxor.Blazor.Web.ReduxDevTools using your preferred installation method:
- Using the command line,
dotnet add package Fluxor.Blazor.Webanddotnet add package Fluxor.Blazor.Web.ReduxDevTools - Using Package Manager with VS
Install-Package Fluxor.Blazor.WebandInstall-Package Fluxor.Blazor.Web.ReduxDevTools - Or, just simply add the package references through the NuGet GUI within VS
Once we've got Fluxor added to the project, we'll need to add a few references to the library through our code to bring
into scope. In our index.html file, let's add the required JavaScript bundle just above the closing </body> tag:
index.html
<!doctype html>
<html>
    <head>
        <!-- Meta and CSS references -->
    </head>

    <body>
        <!-- Existing bootstrapped HTML -->

        <!-- Fluxor JS dependencies -->
        <script src="_content/Fluxor.Blazor.Web/scripts/index.js"></script>
    </body>
</html>
With our JS references in scope, let's add a project reference to our _Imports.razor file below all of our other
imported namespaces
_Imports.razor
@* ...existing project references *@
@using Fluxor
Now, in our Program.cs entry point file, let's add Fluxor to the DI container so we can utilize its services
throughout our components:
Program.cs
// Imported namespaces...

namespace StateManagementWithFluxor
{
    public class Program
    {
        public static async Task Main(string[] args)
        {
            var builder = WebAssemblyHostBuilder.CreateDefault(args);
            builder.RootComponents.Add<App>("app");

            builder.Services.AddTransient(sp => new HttpClient { BaseAddress = new Uri("https://jsonplaceholder.typicode.com") });

            // Add Fluxor
            builder.Services.AddFluxor(options =>
            {
                options.ScanAssemblies(Assembly.GetExecutingAssembly());
                options.UseReduxDevTools();
            });

            await builder.Build().RunAsync();
        }
    }
}
Notice I've also updated the base URI our default HTTP client instance points to (defaults to the project host) to the
JSON Placeholder base API address in https://jsonplaceholder.typicode.com. In a later post, we'll refactor this HTTP
service instance to
a typed HTTP client
instance; for now, this will do just fine. Along with adding our Fluxor instance to the DI container, we've also told it
to enable Redux Dev Tools that will allow us to see, in realtime, our flux workflow as we interact with our application,
where we'll be able to debug, time travel between state transitions, and a few other powerful features that come in
handy when working with flux-based frontend applications.
Lastly, let's add a reference to the flux store that will serve as the source of record for our entire application,
containing all current stateful information, within App.razor
App.razor
<Fluxor.Blazor.Web.StoreInitializer />

<Router AppAssembly="@typeof(Program).Assembly">
    <Found Context="routeData">
        <RouteView RouteData="@routeData" DefaultLayout="@typeof(MainLayout)" />
    </Found>
    <NotFound>
        <LayoutView Layout="@typeof(MainLayout)">
            <p>Sorry, there's nothing at this address.</p>
        </LayoutView>
    </NotFound>
</Router>
At the top, we've added a reference to Fluxor's StoreInitializer that will bootstrap our state container,
among a few other things,
but I'll let the curious folks parse through the lifecycle hooks to get a feel of what it does for us.
With Fluxor ready to roll, let's take a few minutes to talk shop about the center of attention and the entire reason for this series, flux.
Flux in a nutshell
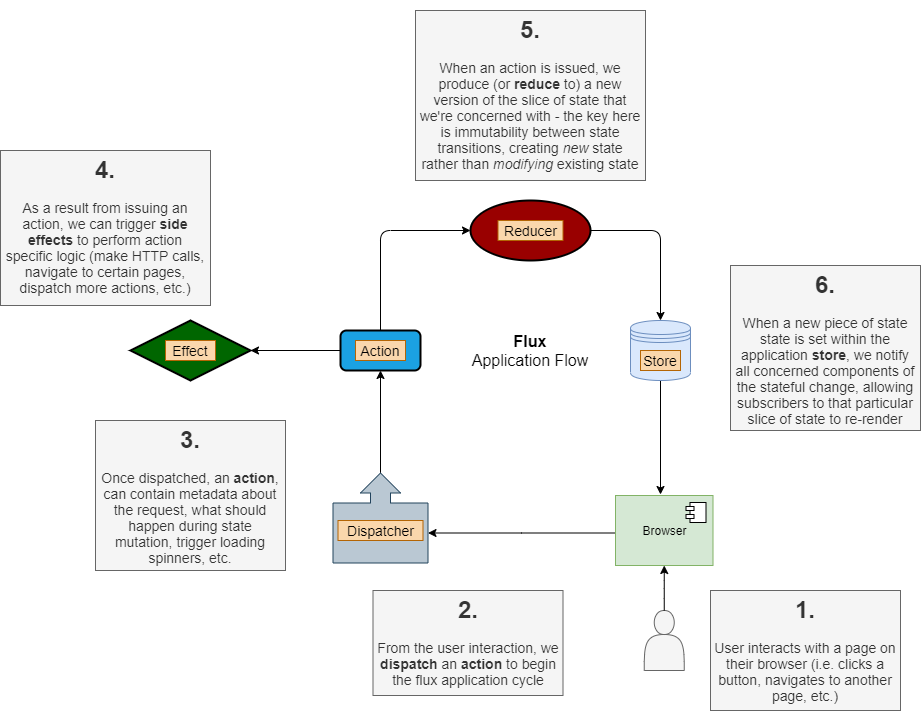
In my totally awesome flowchart, I've outlined the big ideas with flux and what an application's architecture, using the design pattern, might look like. We'll go through each key term in the flux lexicon, but to skim the top, there are six key terms you'll hear frequently when using any flux/redux library:
- Dispatcher - Nothing more than a request delegator of sorts, this guy/gal is in charge of issuing actions anytime a user decides to do something on our page
- Actions - A metadata container containing information about what the user did and what our application should do after the user has performed the interaction with our page to kick off our flux pipeline
- Side Effects - As subscribers to dispatched actions, I like to think of effects as listeners of specific actions, performing resulting tasks based on what action was just issued
- Reducers - Simple pure methods whose only job is to take state in, and spit state out by way of non-destructive mutation, i.e. taking our current state object in, examining what action was just dispatched and how the state should be transformed, and spitting out a new state object with said transformations
- State - A snapshot of the currently rendered page, containing any and all data our application is concerned about at that point in time
- Store - The central piece, our store is the state container, holding on to all current slices of state that all components ultimately subscribe to and react to any store changes accordingly when the store notifies listeners there's been an update
Let's break each of those down in correlation to the flux application flowchart above, starting at step 1:
- To kick things off, a user of our web application lands on our site, in absolute awe of our CSS ability, and wants to interact with the page. In our example scenario, let's pretend our user clicks a button that ultimately navigates them to another page that will have some data loaded from an external API in a table
- When the user clicks the button to kick off the workflow, we tie said button click to a dispatcher that, you guessed it, dispatches an action that contains the metadata related to "hey, the user just pressed this button"
- With the action in flight, we've kicked off our flux cycle that will eventually end up in a state mutation that will contain the aforementioned API data our components will pull in and render on the page for the user
- A side effect that listens for specific button clicks is notified the button they're interested in was clicked, and that they should make (in our case) an HTTP network call to the API in question to retrieve some data
- As our button click action fires off, a reducer listening for that specific button click evaluates the current state and determines what the new state should look like. In our case, we've issued a kickoff action, so the reducer might mutate our current state to produce a new state that contains a boolean flag notifying components there's an API call in progress
- This new state is then set within our flux store, causing a notification to fire off to all concerned components that "hey, there's a new piece of state!" and cause our pages to render accordingly to what conditional state properties they might be interested in (possibly rendering a loading spinner, for our case)
Whew, that's quite a bit for just making a simple API call. You might be asking the question, however, due to the unfortunate limit on the speed of light, what happens when the API call returns? Our state has already been set from the initial kickoff button click, so how do we get the data that has now been returned from the API to display on the page? I'm glad you asked. Side effects themselves also have the ability to dispatch actions, kicking off the entire flux cycle anew, and there's a common pattern in flux to issue success and failure commands (somewhat debated, as I fall into this camp to keep clean action separation) from effects given the response to a blocking action (like an external network call, file I/O, etc.). When our side effect has confirmed the network call came back successfully with the data in question, we can dispatch another action containing said data, that will ultimately kick off this cycle once more, reach a reducer waiting to be notified for that particular success action, and produce a new state with the data contained from the action, which will then be set within our store where our components will be notified once again causing them to re-render.
Okay, let's catch our breath here for a sec, as that was more, or less, flux in a nutshell. At this point, we should probably ask ourselves the question: why even bother with flux? That's quite a bit going on, only to become increasingly more complex the more interaction we add to an application. While we could probably answer that a few different ways, one of my favorite reasons for using flux/redux in any frontend application is predictable state transitions. In other words, using flux/redux, we reduce the number of states our site can have and find ourselves less and less wondering " how in the heck did that happen?"
Take for example a modern Angular application. A large application will have tens of hundreds (yes, you heard that right) of components all dynamically interacting with middle-tier data storage services that call other services that make network calls, etc. and are used all over the place. Your middle-tier data storage service (in flux/redux, this would be your state) might be used by many components, all independently interacting with this singular service, and might unknowingly effect another reliant component's local rendered state without any notification. This happens quite often in large Angular projects without redux providers, and at scale, can cause a lot of unnecessary headache.
Back to business
Okay, now that we've covered the syllabus for flux 101, let's jump into the code and put these things to practice. I've
removed the Counter.razor, FetchData.razor, and SurveyPrompt.razor pages simply because we don't need them, and
I've updated our NavMenu.razor component to reflect those changes:
NavMenu.razor
<div class="top-row pl-4 navbar navbar-dark">
    <a class="navbar-brand" href="">StateManagementWithFluxor</a>
    <button class="navbar-toggler" @onclick="ToggleNavMenu">
        <span class="navbar-toggler-icon"></span>
    </button>
</div>

<div class="@NavMenuCssClass" @onclick="ToggleNavMenu">
    <ul class="nav flex-column">
        <li class="nav-item px-3">
            <NavLink class="nav-link" href="" Match="NavLinkMatch.All">
                <span class="oi oi-home" aria-hidden="true"></span> Home
            </NavLink>
        </li>
        <li class="nav-item px-3">
            <NavLink class="nav-link" href="todos">
                <span class="oi oi-list-rich" aria-hidden="true"></span> Todos
            </NavLink>
        </li>
    </ul>
</div>

@code {

    // Nothing new here...

}
I've added a hyperlink to a new route, /todos, and to accommodate, let's go ahead and create a new page under
the Pages folder called Todos.razor with the following markup:
Todos.razor
@inherits Fluxor.Blazor.Web.Components.FluxorComponent

@page "/todos"

<h3 class="text-center mb-3">Todos</h3>

@code {

    protected override void OnInitialized()
    {
        base.OnInitialized();
    }

}
Inside Todos.razor, we've inherited from a FluxorComponent, which in turn inherits from a ComponentBase, which,
again you've guessed, serves as the parent for all .razor pages in a Blazor application. Inheriting from
a FluxorComponent allows us to call its implmentation of OnInitialized(), the first lifecycle hook a .razor page
goes through during its rendering process.
If we start up our application now, either by hitting F5 in Visual Studio, or running dotnet watch run from the
command line, we nothing particularly exciting on our site just yet (just a a landing page and one route-able page).
With our central flux architecture in place, let's go ahead and start wiring things up. First, let's create a model that
will house the response from our network calls to the JSON Placeholder API. Let's create a Models folder in the root
of our project, and underneath that, let's add a Todos folder as well. In our Todos directory, let's create
a TodoDto.cs class file with the following content:
TodoDto.cs
namespace StateManagementWithFluxor.Models.Todos
{
    public class TodoDto
    {
        public int Id { get; set; }

        public string? Title { get; set; }

        public bool Completed { get; set; }

        public int UserId { get; set; }
    }
}
Nothing super exciting here, only to note that for this project, I've enabled nullable reference types (see
our .csproj file) and the compiler will complain if I we're to mark the Title as a string type rather than a
nullable string? type without an explicit constructor initializing it's value. The ASP.NET Core HTTP client class is
responsible for serializing requests and deserializing responses. While it's perfectly fine for our requests to be
immutable data types (which we'll be doing throughout this series), upon deserialization from an HTTP response, the
framework will internally call our model's setters, so we need to make them publicly available.
With our response model taken care of, let's go ahead and wire up our first application workflow: retrieving a list of todos.
Defining our first action
If we call the JSON Placeholder API /todos endpoint, we'll see the following response:
[
    {
        "userId": 1,
        "id": 1,
        "title": "delectus aut autem",
        "completed": false
    },
    {
        "userId": 1,
        "id": 2,
        "title": "quis ut nam facilis et officia qui",
        "completed": false
    }
    // Repeat 100 times...
]
We'll need to define a piece of state to hold the API response for the list of todos so that we can display it on the
todos page. Let's start be defining our todos state that we'll be interacting with throughout our application. At the
root of our project, let's create a Store folder, and underneath that, let's add a State directory. You're free use
any flux/redux folder structure you feel comfortable with, but I tend to take an opinionated approach similar to the
following file structure:
/Store
    /Features
        /Feature1
            /Actions
            /Reducers
            /Effects
            Feature1.cs
        /Feature2
            /Actions
            /Reducers
            /Effects
            Feature2.cs
    /State
        FeatureState1.cs
        FeatureState2.cs
To set ourselves up for ease of feature extension in the future, let's define a RootState.cs class file that will hold
common feature state properties (loading flags, common errors, etc.):
RootState.cs
namespace StateManagementWithFluxor.Store.State
{
    public abstract class RootState
    {
        public RootState(bool isLoading, string? currentErrorMessage) =>
            (IsLoading, CurrentErrorMessage) = (isLoading, currentErrorMessage);

        public bool IsLoading { get; }

        public string? CurrentErrorMessage { get; }

        public bool HasCurrentErrors => !string.IsNullOrWhiteSpace(CurrentErrorMessage);
    }
}
Exactly as mentioned above, our RootState will serve the purpose of playing the parent to all feature state slices
where we'll be able to define common properties. In large applications, you might have multiple feature
states (TodosState.cs, ArticlesState.cs, UsersState.cs, etc.) so defining a common state for all to descend from
allows us to build in shared state properties without duplicating such properties across multiple states. Notice we've
marked this class as abstract to convey the intent to our fellow developers that this class should be inherited from,
not instantiated on its own.
With our common state defined, let's add a TodosState.cs file inside of our State subfolder to contain all of our
relevant state properties:
TodosState.cs
using StateManagementWithFluxor.Models.Todos;
using System.Collections.Generic;

namespace StateManagementWithFluxor.Store.State
{
    public class TodosState : RootState
    {
        public TodosState(bool isLoading, string? currentErrorMessage, IEnumerable<TodoDto>? currentTodos, TodoDto? currentTodo)
            : base(isLoading, currentErrorMessage)
        {
            CurrentTodos = currentTodos;
            CurrentTodo = currentTodo;
        }

        public IEnumerable<TodoDto>? CurrentTodos { get; }

        public TodoDto? CurrentTodo { get; }
    }
}
Descending from our RootState we construct an immutable state object (i.e. no setters on any properties) and define
two feature specific properties: CurrentTodos and CurrentTodo. CurrentTodos will hold the most recent list of
todos returned from the JSON Placeholder API's /todos endpoint, with CurrentTodo holding the most recent todo
returned from the /todos/:id endpoint. Again, I've declared these explicitly as nullable, since there may be points in
our application's lifecycle that we'll have yet to interact with any APIs, and no data will be presently available
within our store.
With our state objects defined, let's define our first feature. Inside the Store folder, let's add a Features
folder, and within that, a Todos folder. Again, sticking to the saforementioned file structure, let's add
a TodosFeature.cs file underneath our Features folder:
TodosFeature.cs
using Fluxor;
using StateManagementWithFluxor.Store.State;

namespace StateManagementWithFluxor.Store.Features.Todos
{
    public class TodosFeature : Feature<TodosState>
    {
        public override string GetName() => "Todos";

        protected override TodosState GetInitialState() =>
            new TodosState(false, null, null, null);
    }
}
Descending from Feature<TodosState>, this tells Fluxor at startup (during its initial assembly scanning) that this
will be a store feature named Todos that will house a TodosState object. Later when we look at our current state
with Redux Dev Tools, we'll see that our store is nothing more than a JSON object containing a Todos node with all the
properties we've defined in the TodosState class. Fluxor needs to know what initial state our todos feature slice
should have, so we add a constructor to initialize an initial state object. Some people might cringe when they
see null being explicitly passed to a constructor, but thanks to C#'s nullable reference type, we're telling our
fellow developers that our intent is to express the absence of those properties, and before dereferencing those
properties in a component, the compiler will warn them if they do not check for null before doing so. Pretty cool,
huh?
With our first feature defined, let's create our first workflow. Let's create an Actions folder underneath our Todos
directory and add one more folder called LoadTodos underneath our newly created Actions folder. In our LoadTodos
subfolder, let's create three classes: LoadTodosAction.cs, LoadTodosSuccessAction.cs,
and LoadTodosFailureAction.cs action:
LoadTodosAction.cs
namespace StateManagementWithFluxor.Store.Features.Todos.Actions.LoadTodos
{
    public class LoadTodosAction
    {
    }
}
LoadTodosSuccessAction.cs
using StateManagementWithFluxor.Models.Todos;
using System.Collections.Generic;

namespace StateManagementWithFluxor.Store.Features.Todos.Actions.LoadTodos
{
    public class LoadTodosSuccessAction
    {
        public LoadTodosSuccessAction(IEnumerable<TodoDto> todos) =>
            Todos = todos;

        public IEnumerable<TodoDto> Todos { get; }
    }
}
LoadTodosFailureAction.cs
using StateManagementWithFluxor.Store.Features.Shared.Actions;

namespace StateManagementWithFluxor.Store.Features.Todos.Actions.LoadTodos
{
    public class LoadTodosFailureAction : FailureAction
    {
        public LoadTodosFailureAction(string errorMessage)
            : base(errorMessage)
        {
        }
    }
}
- Our
LoadTodosAction.csclass contains no logic, and is used for nothing more that a typed action for the flux pipeline to signal to its subscribers of theLoadTodosworkflow. Kickoff actions can contain metadata and we'll see this when we retrieve todo details by ID. - Our
LoadTodosSuccessAction.csclass contains a list of non-nullableTodoDtoitems that will act as the transport object moving the JSON Placeholder API response into our flux store. - Our
LoadTodosFailureAction.csclass will trigger an error workflow, allowing us to gracefully respond to any network failures or errors returned from the API to be propagated back to our components.
Notice I've also defined a FailureAction.cs class that acts as the root for all failure actions. For our simple
application, failure actions will more often that not contain some type of error identifier (in our case, a message, but
could also contain an ID), and I've defined it in a Shared feature folder underneath an Actions subdirectory:
Features/Shared/Actions/FailureAction.cs
namespace StateManagementWithFluxor.Store.Features.Shared.Actions
{
    public abstract class FailureAction
    {
        protected FailureAction(string errorMessage) =>
            ErrorMessage = errorMessage;

        public string ErrorMessage { get; }
    }
}
Again, this abstract class tells other developers that this should be seen as the common failure action all failure
actions should descend from, so we can reuse common error properties (message, ID, etc.). With our action defined, let's
create a reducer to help set the pieces of state according to dispatched action. Underneath the Todos feature folder,
let's add a Reducers folder with a LoadTodosActionsReducer.cs class:
LoadTodosActionsReducer.cs
using Fluxor;
using StateManagementWithFluxor.Store.Features.Todos.Actions.LoadTodos;
using StateManagementWithFluxor.Store.State;

namespace StateManagementWithFluxor.Store.Features.Todos.Reducers
{
    public static class LoadTodosActionsReducer
    {
        [ReducerMethod]
        public static TodosState ReduceLoadTodosAction(TodosState state, LoadTodosAction _) =>
            new TodosState(true, null, null, state.CurrentTodo);

        [ReducerMethod]
        public static TodosState ReduceLoadTodosSuccessAction(TodosState state, LoadTodosSuccessAction action) =>
            new TodosState(false, null, action.Todos, state.CurrentTodo);

        [ReducerMethod]
        public static TodosState ReduceLoadTodosFailureAction(TodosState state, LoadTodosFailureAction action) =>
            new TodosState(false, action.ErrorMessage, null, state.CurrentTodo);
    }
}
Our reducer class is simply just a static object with static methods invoked at runtime that takes in the current
feature slice state, and returns a new TodosState object based on any relevant data contained within the action that
caused the reducer method to be invoked.
- The
ReduceLoadTodosActionmethod causes our reducer to create a new state with theIsLoadingflag set totrue, telling components there's currently an API call in flight. Since our current action workflow is just dealing with gathering a list of todos and does not effect the currently selected todo piece of state, we set whatever theCurrentTodoproperty was from the old state on the new state as to not effect any components concerned with that particular property. - The
ReduceLoadTodosSuccessActionmethod returns a new state setting theIsLoadingtofalseletting components know our API call has completed, and we set theCurrentTodosstate property to theTodoproperty dereferenced from theLoadTodosSuccessActionpassed in. We'll see how this property is initially populated in theLoadTodosSuccessActionclass shortly. - The
ReduceLoadTodosFailureActionmethod again sets theIsLoadingflag tofalsefor the reasons mentioned above, and we populate theCurrentErrorsproperty on our state so that our components may react accordingly to the API failure.
With our reducer defined, let's go ahead and create a side effect that will do the work of calling the API and
dispatching the success or failure action based on its response. Again, back in our Features/Todos subfolder, let's
add an Effects folder with a LoadTodosEffect.cs class:
LoadTodosEffect.cs
using Fluxor;
using Microsoft.Extensions.Logging;
using StateManagementWithFluxor.Models.Todos;
using StateManagementWithFluxor.Store.Features.Todos.Actions.LoadTodos;
using System;
using System.Collections.Generic;
using System.Net.Http;
using System.Net.Http.Json;
using System.Threading.Tasks;

namespace StateManagementWithFluxor.Store.Features.Todos.Effects
{
    public class LoadTodosEffect : Effect<LoadTodosAction>
    {
        private readonly ILogger<LoadTodosEffect> _logger;
        private readonly HttpClient _httpClient;

        public LoadTodosEffect(ILogger<LoadTodosEffect> logger, HttpClient httpClient) =>
            (_logger, _httpClient) = (logger, httpClient);

        protected override async Task HandleAsync(LoadTodosAction action, IDispatcher dispatcher)
        {
            try
            {
                _logger.LogInformation("Loading todos...");

                // Add a little extra latency for dramatic effect...
                await Task.Delay(TimeSpan.FromMilliseconds(1000));
                var todosResponse = await _httpClient.GetFromJsonAsync<IEnumerable<TodoDto>>("todos");

                _logger.LogInformation("Todos loaded successfully!");
                dispatcher.Dispatch(new LoadTodosSuccessAction(todosResponse));
            }
            catch (Exception e)
            {
                _logger.LogError($"Error loading todos, reason: {e.Message}");
                dispatcher.Dispatch(new LoadTodosFailureAction(e.Message));
            }

        }
    }
}
Let's break this code down:
- First, we descend from Fluxor's
Effect<TAction>class, with ourTActiongeneric type being ourLoadTodosActionclass so this effect knows to invoke itsHandleAsyncmethod whenever that action is dispatched - Fluxor scans our assembly for all classes descending from
Effect<TAction>and adds them to the DI container, so we have the ease of injecting dependencies at runtime - We inject an
HttpClientinstance and a logger into the class using an expression bodied tuple constructor (some C# syntactic sugar) HandleAsyncships with anIDispatcherinstance for us to utilize to issue more actions inside our effect- We make the API call using the injected
HttpClientinstance, and use theGetFromJsonAsync<TResponse>extension method from theSystem.Net.Httpnamespace the .NET team has so generously provided us to make the HTTP call and deserialize the response into ourTodoDtolist - If all goes well and the API call is successful, we issue another action in the form of a
LoadTodosSuccessActionclass constructed with the endpoint's response - If there's any exceptions thrown, we'll
catchand log the error, as well as issue a failure action with the exception message
Recall the flux pipeline mentioned earlier. Throughout our list retrieval process, we'll be going through two iterations of dispatcher > action > effect/reducer > store:
- (Initial)
LoadTodosAction>LoadTodosEffect/LoadTodosActionsReducer>TodosStateset in the store - (Post API call)
LoadTodosSuccessAction/LoadTodosFailureAction>LoadTodosActionsReducer>TodosStateset in the store
In the first iteration, we fire our initial action to signal to our application to call to the API and retrieve some data, with the following iteration being the outcome of the API call. When the API call completes and another action is issued, either the success or failure actions, we'll again invoke the proper reducer method to produce a new slice of feature state in store with either the loaded data for components to access, or an error message for the components to display back to the user.
With our actions, reducer, and side effect defined, let's add one more service to help with dispatching actions that our
components will be able to inject and use accordingly: our StateFacade.cs service:
StateFacade.cs
using Fluxor;
using Microsoft.Extensions.Logging;
using StateManagementWithFluxor.Store.Features.Todos.Actions.LoadTodoDetail;
using StateManagementWithFluxor.Store.Features.Todos.Actions.LoadTodos;

namespace StateManagementWithFluxor.Services
{
    public class StateFacade
    {
        private readonly ILogger<StateFacade> _logger;
        private readonly IDispatcher _dispatcher;

        public StateFacade(ILogger<StateFacade> logger, IDispatcher dispatcher) =>
            (_logger, _dispatcher) = (logger, dispatcher);

        public void LoadTodos()
        {
            _logger.LogInformation("Issuing action to load todos...");
            _dispatcher.Dispatch(new LoadTodosAction());
        }
    }
}
Before we break this code down, let's discuss why we might want to use a facade, and furthermore, what the heck even is a "facade."
Decoupling components from flux
With flux being a proven robust frontend application architecture, in large codebases, you'll most likely have hundreds of different actions with many different feature state slices in a store. For those with Redux Dev Tools installed, if you we're to navigate to Reddit with the dev console Redux tab open, you'll see the reddit store contains roughly 50 or so different state slices, each complexly nested with various pieces of that particular state's node. In Redux, there's an idea used quite often called the facade pattern that provides a layer of separation between our view components and our store interactions. As we tend to think of backend architectures in various layers, the growing complexity of the frontend can be thought of in the same way, with a layered architecture to encapsulate the various features of an application.
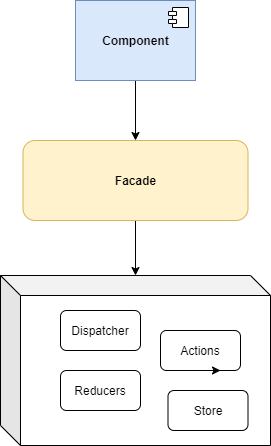
If we consider the rendered view our user interacts with as the innermost layer akin to the domain layer in onion architecture, then our flux implementation for state management would be a low-level detail in charge of providing the data for those view components. If we think of the classic onion diagram, outermost dependencies should always point inward, implying that our rendered views should not be concerned with, or even care, how the data they display is given to them. We simply give our views read-only access to the store for them to treat as the source of record; how the data gets there is none of their concern.
By providing a facade interface between our components and the flux cycle, our components do not need to know about individual actions, only workflows concerning what data they need. For simple applications like ours, it may be a bit overkill, but I would argue in large complex applications, adding a facade layer does provide the benefit of implementation details being shrouded from the view components and allowing us to rework actions and workflows without breaking our contracts between the view layer and the flux layer.
Alright, now back to our regularly scheduled program.
Back to business
With our facade in place, our .razor components now need only to inject the StateFacade and whatever feature slice
state they're concerned about to render their markup. As we're adding a service, we also need to add it to the DI
container. Back in our Program.cs:
Program.cs
// Existing namespaces...
using StateManagementWithFluxor.Services;

namespace StateManagementWithFluxor
{
    public class Program
    {
        public static async Task Main(string[] args)
        {
            // Previous services being wired up...

            // Add custom application services
            builder.Services.AddScoped<StateFacade>();

            await builder.Build().RunAsync();
        }
    }
}
We've added our StateFacade as a scoped service available for injection anew every time the service is plucked from
the DI container and injected at runtime into a .razor page.
Putting it all together
With our feature, actions, reducers, side effect, and store defined and ready to go, let's FINALLY start writing some
markup to display all this darn data. First, let's open up our MainLayout.razor file and have it inherit from
a FluxorComponent as it'll be housing components interacting with pieces of state that involve event handlers, and
will be in need of proper disposal later in the series:
MainLayout.razor
@inherits Fluxor.Blazor.Web.Components.FluxorLayout

<div class="sidebar">
    <NavMenu />
</div>

<div class="main">
    <div class="top-row px-4">
        <a href="http://blazor.net" target="_blank" class="ml-md-auto">About</a>
    </div>

    <div class="content px-4">
        @Body
    </div>
</div>

@code {

    protected override void OnInitialized()
    {
        base.OnInitialized();
    }

}
We've add the @inherits Fluxor.Blazor.Web.Components.FluxorLayout directive so that we can call FluxorLayout's
implementation of the OnInitialized() lifecycle hook similarly to our Todos.razor file. With this in place, let's
open up our Todos.razor page again and add some markup, as well as the injected services we'll need to properly render
the data:
Todos.razor
@inherits Fluxor.Blazor.Web.Components.FluxorComponent

@page "/todos"

@using StateManagementWithFluxor.Store.State
@using StateManagementWithFluxor.Services

@inject IState<TodosState> TodosState
@inject StateFacade Facade

<h3 class="text-center mb-3">Todos</h3>

@if (TodosState.Value.IsLoading)
{
    <div class="d-flex flex-row justify-content-center">
        <div class="spinner-border" role="status">
            <span class="sr-only">Loading...</span>
        </div>
    </div>
}
else if (TodosState.Value.HasCurrentErrors)
{
    <span>Whoops! Looks like an issue occurred loading todos :(</span>
}
else if (!(TodosState.Value.CurrentTodos is null) && TodosState.Value.CurrentTodos.Any())
{
    <table class="table table-hover">
        <thead>
            <tr>
                <th scope="col">ID</th>
                <th scope="col">Title</th>
                <th scope="col">Completed</th>
                <th scope="col">User ID</th>
            </tr>
        </thead>
        <tbody>
            @foreach (var todo in TodosState.Value.CurrentTodos.Take(10))
            {
                <tr>
                    <td>@todo.Id</td>
                    <td>@todo.Title</td>
                    <td>@todo.Completed</td>
                    <td>@todo.UserId</td>
                </tr>
            }
        </tbody>
    </table>
}

@code {

    protected override void OnInitialized()
    {
        // Issue the load todos command, if no current todos have been loaded
        if (TodosState.Value.CurrentTodos is null)
        {
            Facade.LoadTodos();
        }

        base.OnInitialized();
    }

}
Finally, we've got some testable markup! Using some simple Bootstrap (feel free to use your favorite CSS provider,
you'll have to pry Bootstrap out of my cold, dead hands), we've added a table to display our todos, taking only the
first 10 for brevity, as well as some logic to load todos using our StateFacade with the line Facade.LoadTodos();.
Our Todos component has no concern with how the todos are loaded or what actions are involved, it's only concerned
about issuing a command to get the todos loaded into the store. If we to fire up our application once more and navigate
to the Todos nav item (open your dev console to the Network tab), we should see an API call being made to the todos
endpoint, a loading spinner spinning for just a few seconds, and then... a todo list!
Let's explore a little using Redux Dev Tools (download for your favorite browser). After you installed the addon, let's
head back to the home page and refresh the application with the Redux tab selected in the dev console. Right off the
bat, we see three actions being issued:
@@INIT- Redux Dev Tool's internal actionStoreInitializedAction- Recall the<Fluxor.Blazor.Web.StoreInitializer />component we added toApp.razor, this is Fluxor initializing our feature states from theFeature<TState>found during assembly scanning and setting up our default states from theGetInitialState()methodGoAction- Fluxor's internal navigation action that sets the@routingpiece of state on our store with theUrinode within it (we'll hook into this action as well in a later post)
Now, if we navigate to Todos on the side nav, we should see three more actions being issued in the following order:
- Another
GoActionissued internally by Fluxor - Our
LoadTodosActionwe defined earlier - And finally, our
LoadTodosSuccessActioncontaining the todo items returned from the API (click on theActiontab on the action in the list and you see see ourTodoproperty underneath thePayloadproperty)
If we click on the LoadTodosSuccessAction on the action list and then the State tab, we should see our Todos
feature slice node with a CurrentTodos node that contains an array of all the todo items returned from the API!
You might be asking the question - how does the page know to render the list? Recall the IState<TodosState> State
directive we injected into our Todos.razor page - because we've inheried from a FluxorComponent, when we
call OnInitialized(), our component subscribes to state changes of the injected state type (TodosState in our case),
and when a new state is set (from reducers producing a new state on an issued action), Blazor's built
in StateHasChanged() is called for us, forcing components to re-render their markup accordingly. The hard work is done
for us, while we get to sit back and gaze at our beautiful todos in all their glory.
Wrapping up
So far, we've seen what flux is, why we would want to use it in a single page application, and how to setup Fluxor with Blazor. For brevity, I've also added a workflow to retrieve todos by ID, but I'll leave the implementation details up to the reader (take a look a the source code here to see exactly how I've done it - nothing crazy, just a new page with some more actions, reducers, and effects). We've seen how using Redux Dev Tools, we're able to peek into the workflow step-by-step of our application and observe incremental state changes, and later, we'll see the real power of Dev Tools in time travel state transitions.
Next up, we'll implement some CRUD operations and make a few improvements to our current implementation, but for now, we'll call that a day. Cheers!