As developers, we love reusability: components, modules, CSS, code snippets, libraries, you name it... if it can be made generic, one can safely bet that a friendly developer will at some point attempt a Herculean effort to do so. Enter the monorepo - a development style aimed at encouraging reusability, common versioning, and improved developer experience when working on large teams. While there are quite a few benefits of working within a single repository for multiple projects, those aforementioned are just a few of the many perks. As I continue to veer off the .NET blogging path for a bit, I thought it would fun to write a bit about my favorite development tool lately in the JS/TS realm, Nx.
What is Nx?
Nx is a tool developed by Nrwl to empower development promoting the reuse of code for applications all developed within the same repository or workspace. Using Nx, we can create independent applications all with their own separate lines of business, project domains, CI/CD processes, etc. all while developing common dependencies for those applications to consume all within the same repository. I won't cover in-depth what exactly a monorepo is and why you should consider using the development paradigm on your team, as there are a plethora of articles explaining their existence by developers much, much smarter than myself.
Monorepos at a glance
When developing within a monorepo, we can independently write entirely separate applications that deal with separate concerns while developing their common dependencies at the same time, with the payoff being reusability of shared components and modules as far as the eye can see.
Take, for example, a common business application for your organization's users that may have two sides of the same shared coin - a user facing [insert your org's line of business] application, with an org internal admin-based application to help manage users with what the application may be dealing with.
In the case of the almighty todo-based app, a user facing todo application may be deployed out to the DMZ allowing users to add, update, and manage their todo items. Then the fateful day comes where upper management decides they would like an admin tool built for the company's business analysts to assist with users' todos, allowing for reporting on certain types of todos, managing a user's todo should it require a little assistance, etc.
From an architectural standpoint, while it may be tempting to develop such functionality into the same user facing application with some sort of heightened privilege given to certain users to access the admin functionality, one might argue that such functionality is an entirely separate concern in comparison to what our existing users of our todo application expect. So we make the decision to rip out common code, components, modules, etc. and put them in a separate shared repository that both the todos app and admin todos app pull in as a dependency into their, again, separately maintained projects. Three projects, three separate repositories, three individual build/deployment pipelines, and the list goes on.
As much fun as it sounds managing and maintaining what are essentially three separate projects, there's a lot of work being done in our previous scenario. Wouldn't it be great to simply development all of our code in the same place? Enter the monorepo.
Nx at a glance
While Nx may seem to be well suited for the JS/TS world, it is a language agnostic toolkit with lots of community plugins for varying languages, frameworks, and ecosystems. I like to think of Nx as a metaframework, or a framework to help manage your framework specific libraries and applications with well-defined conventions, all while bringing modern tools we developers love baked into your workspace (Jest, ESLint, Storybook, etc.). Again, while Nx is itself an entire realm of knowledge one can easily spend an entire day reading about, for our purposes of this article, we'll only touch on a few of the many tools Nx gives us while developing our applications all within the same repository.
To keep things simple, let's use our previous example of building out a todos application using Angular to see how we might cleanly architect such an application. Our game plan will be something like:
- One todo application, serving as nothing more than a glorified dependency injection container/puppeteer for the libraries it depends on
- Separate libraries that each have a single concern - state management, UI, and utilities
While it might be tempting to throw everything into our single todo application in place of separate libraries, we should make it a point to keep our applications as simple as possible, offloading most of our dependencies into scoped libraries and modules each with a designated purpose. What does this mean in practice? Let's look at an example architecture we'll emulate while developing our applications within an Nx monorepo:
\apps
  \todos
\libs
  \todos
    \ui
    \features
    \services
We're effectively building a single entry point for our users into our codebase - our todos app. Our todos app, in terms of an Angular project, will exist as nothing more than the container for dependencies, assets, and environment specific settings. By offloading UI components, services, core business logic and the like, we build in contextual boundaries to our todos application in the form of dependent modules that each deal with their individual concerns, while exposing only the pieces that are required through their public API. In plain English, all this means is that the primary todo application does not concern itself with how its dependencies are implemented - only that they are implemented in some form.
From an Angular code perspective, this means our todos application will look, at its core, like this:
\todos
  \src
    \app
      app.component.html
      app.component.ts
      app.module.ts
About as bare bones as an Angular project can get, our todos app serves again as nothing more than a coordinator of
injected services, dependencies, and modules. This means no \components, \services, \state folders, or any other
core logic that is required for our app to run.
With our precursor to monorepos with Nx out of the way, let's jump into some code!
Getting started
to kick things off, let's create our Nx workspace, preset to Angular:
npx create-nx-workspace@latest exploring-nx --preset=angular
As of this writing, opting for the latest workspace generator will use Nx 13 alongside Angular 13
Nx will kick off, creating our workspace and prompting for a few inputs from us on the command line. Once the process completes, let's go ahead and take a look at what Nx generates for us:
- An
appsdirectory containing our applications that will ultimately be the interface for our users into our code - A
libsdirectory that will eventually contain all of our independent library code each dealing with a specific concern - A
toolsdirectory serving as the home base for custom in-house development scripts and custom workspace generators - A bunch of config files that assist in wiring up apps, libs, devtools, and the like (don't worry too much about these for now)
For our purpose, we'll only be concerned with our todos app and the libraries it depends on. Nx provides some modern developer tooling in ESLint and Prettier to help keep our codebase properly linted and formatted, along with swapping out Karma for Jest and attaching an e2e integration project to our todos app using Cypress. All that out of the box... pretty cool, huh?
Our current workspace structure should look something like the following:
\apps
  \todos
  \todos-e2e
\libs
\tools
For now, we'll only be working in the apps and libs directory to keep things simple.
To start scaffolding out our libraries that will ultimately power our todos app, let's create a directory
in our libs folder called shared. I find it conventionally easiest to namespace
libraries similar to the apps they serve - in this case, we would have created a todos folder under our
libs folder, but for reasons we'll see in the next post (foreshadowing intensifies), we'll put this
under our common namespace so we can access all of the todos code from other applications as well.
While we could just start dropping libraries directly into the libs directory, I've found that as the Nx apps I work
on begin to scale, it's often helpful to namespace your libraries in
accordance to which applications they serve. In our case, we only have one todos app, but
as we begin to add to our workspace, our namespaced libs will shine, neatly organizing our
code in a sane manner.
Generating libraries
Now, to generate an Nx library specific to Angular, Nx provides an amazing CLI to assist in scaffolding our apps and libs. I often turn to the official Nx VS Code plugin, Nx Console, to help facilitate scaffolding my projects as it provides an awesome interface to see all of the available options to us while building out our code.
Let's take a minute to discuss our libs strategy to help us keep things organized within our shared library:
- We'll create a
featuresfolder that will contain our state management code - Next we'll add a
serviceslibrary that will service as our primary data fetching module - Finally, we'll create a
uifolder that will container two sub-libraries inpagesandcomponents(more on this separation later)
I use the terms library and folder in the above list not interchangeably - I like to further refine
my workspace namespaces by including nested folders inside my libs directories where it makes sense.
For our case, we'll have multiple features as we'll see later, so let's create a space for all individual
domains we'll be working with.
To kick things off, let's generate a couple of libraries to see what this looks like in action:
# To generate our shared todos state management library
nx g @nrwl/angular:library todos --directory shared/features

# To generate our shared services library
nx g @nrwl/angular:library services --directory shared

# To generate our shared ui libraries
nx g @nrwl/angular:library components --directory shared/ui
nx g @nrwl/angular:library pages --directory shared/ui
With each containing the following, respectively:
- features: will house our state management code utilizing NgRx
- services: our HTTP layer, will be in charge of calling out to our API to fetch data
- components: our home for dumb components, or simple Angular components that solely take in
@Input()to spit out on the page - pages: Angular components that compose our smaller, dumb components feeding them the data they'll need to generate their markup
Architectural boundaries made easy
With our libraries in place, let's run through what our chain of dependencies will look like. Our main todos application will, once again, act as the orchestrator binding our libraries together in order to access code throughout our workspace. The added benefit of offloading any and all complex logic out of our main apps and into libs is the ability to work independently in areas of code that do not need to be affected by changes from other areas. In plain English, we put all of our app code in libs and make our apps as thin as possible from a logic point of view.
For starters, our todos app will take a dependency on the pages library, as it contains the wrapper components that
aggregate
our smaller, dumb components passing in the data required for those UI components to render things on the page. This
means
our pages library will take a dependency on our components lib and the todos state management library to facilitate
dispatching
actions to retrieve data that our UI components need. From a code perspective, let's import the required modules into
their respective places.
First, in app.module.ts in the todos app, let's import the pages module:
app.module.ts
import { NgModule } from '@angular/core';
import { BrowserModule } from '@angular/platform-browser';
import { ENVIRONMENT } from '@exploring-nx/shared/features/settings';
import { EffectsModule } from '@ngrx/effects';
import { StoreModule } from '@ngrx/store';
import { StoreDevtoolsModule } from '@ngrx/store-devtools';
import { environment } from '../environments/environment';
import { AppRoutingModule } from './app-routing.module';

import { AppComponent } from './app.component';

@NgModule({
    declarations: [AppComponent],
    imports: [
        BrowserModule,
        AppRoutingModule,
        StoreModule.forRoot({}),
        EffectsModule.forRoot([]),
        StoreDevtoolsModule.instrument({
            maxAge: 25,
        }),
    ],
    bootstrap: [AppComponent],
    providers: [
        {
            provide: ENVIRONMENT,
            useValue: environment,
        },
    ],
})
export class AppModule {}
I've added a the NgRx require modules and an AppRoutingModule, with contents being:
app-routing.module.ts
import { NgModule } from '@angular/core';
import { RouterModule } from '@angular/router';

@NgModule({
    imports: [
        RouterModule.forRoot([
            {
                path: '',
                loadChildren: () =>
                    import('@exploring-nx/shared/ui/pages').then(
                        (m) => m.SharedUiPagesModule,
                    ),
            },
        ]),
    ],
    exports: [RouterModule],
})
export class AppRoutingModule {}
Nothing too out of the ordinary here, just doing our normal lazy module loading utilizing the pages library. Things to
note in app.module.ts is the environment provider, as we look under the covers is nothing more than just a shared
provider
used to import environment settings specific to our todos application and having them available to our downstream
libraries (think sharing whatever is in environment.ts to services, components, etc.).
For our SharedUiPagesModule, let's look at the module file to see what imports we'll use:
shared-ui-pages.module.ts
import { NgModule } from '@angular/core';
import { CommonModule } from '@angular/common';
import { RouterModule } from '@angular/router';
import { SharedFeaturesTodosModule } from '@exploring-nx/shared/features/todos';
import { SharedUiComponentsModule } from '@exploring-nx/shared/ui/components';

import { TodosComponent } from './todos/todos.component';

@NgModule({
    imports: [
        CommonModule,
        SharedFeaturesTodosModule,
        SharedUiComponentsModule,
        RouterModule.forChild([
            {
                path: '',
                component: TodosComponent,
            },
        ]),
    ],
    declarations: [TodosComponent],
})
export class SharedUiPagesModule {}
We see that our pages library takes on two additional dependencies in SharedFeaturesTodosModule, our state
management library for todos, and
SharedUiComponentsModule. Now for my favorite about Nx, and a little surprise for whiteboard meeting guys like myself,
go ahead and run the following:
nx dep-graph
...and in your browser window you should the following (after clicking a few checkboxes):
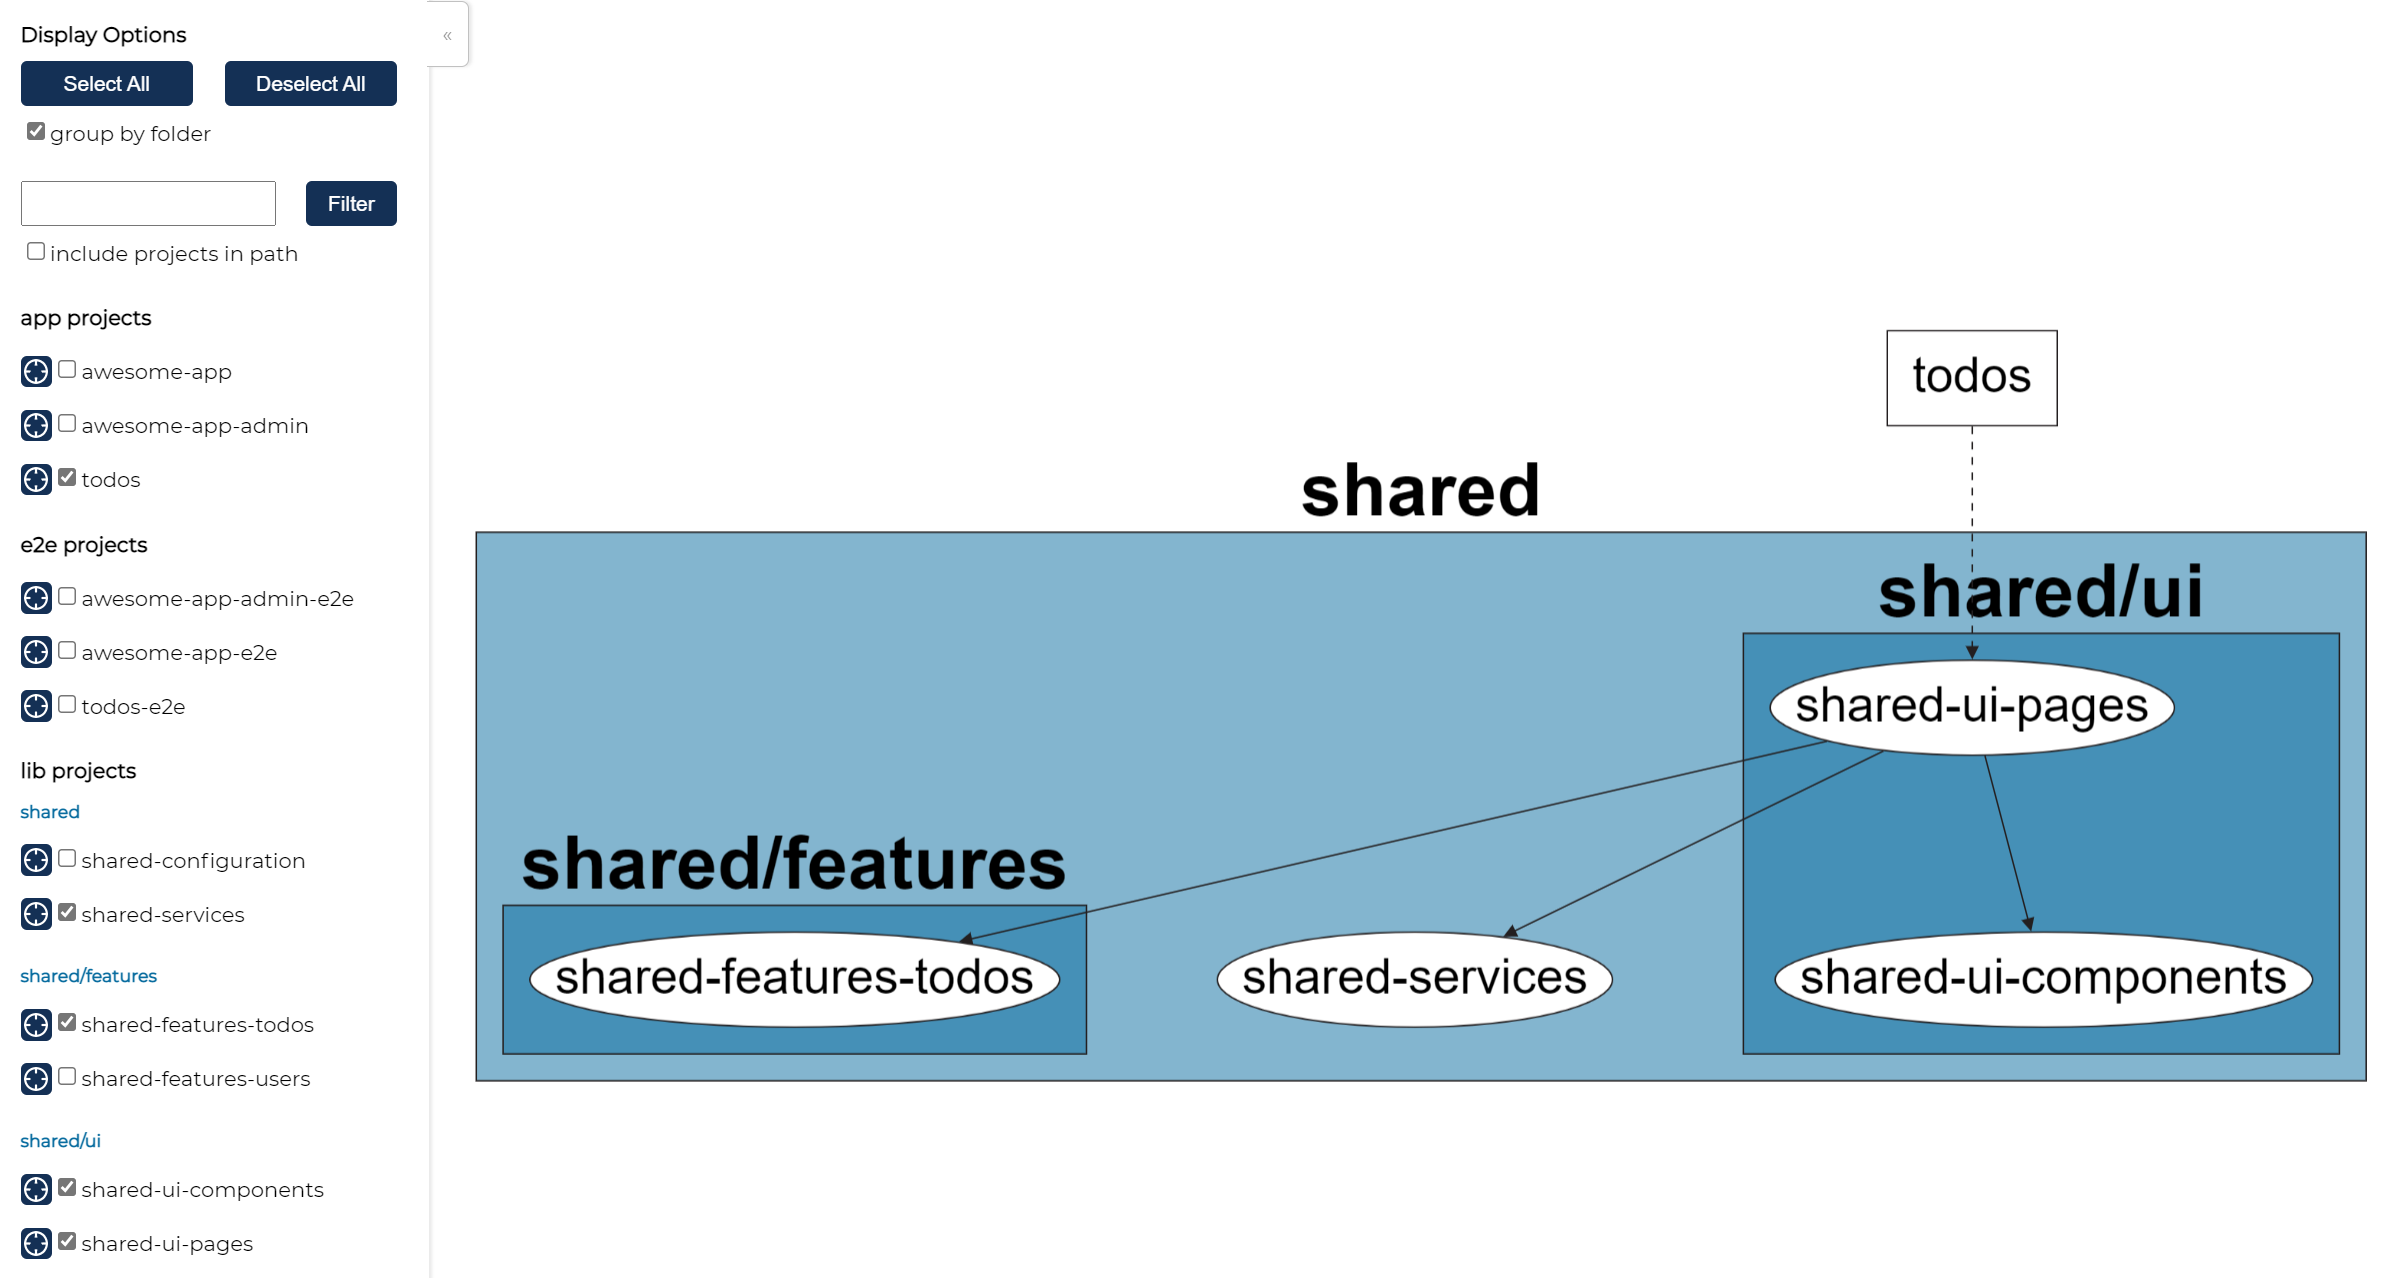
Behold, the almighty dependency graph in all of its glory! Using Nx, not only do we get a conventionalized approach to mono-repository development, we get dep graphs! Dependency graphs allow us to visually see the linking between libraries and their consuming applications, helping us to make more informed decisions about where things should be, and which areas are responsible for their respective domain.
From our dep graph above, we see that our todos app, the ultimate entry point into
the heart of our application, has a single dependency on our pages library, which itself
wires together the lower level details that our higher level policies do not necessarily need
to know the inner workings of. In essence, we've done nothing more than implement simple ports
and adapters.
Implementing state
Okay, I promise that now we'll actually write some code. As I previously mentioned,
I'll be using NgRx to facilitate my application state. Now we could also using nothing more than
simple services-over-Observables, and you're more than welcome to. I love NgRx and the, again, convention it brings to
Angular state management, and simply just a preference.
There are great resources and plenty of articles on NgRx, and I'll defer to those interested in learning
NgRx in depth to them. For those familiar with flux/redux-like development, let's create the following in a
+state folder nesting in our shared/features/todos project underneath the src/lib subdirectory (
subdirectory-ception):
todos.reducer.ts: your typical reducer function that defines our state and which mutations it can take on to form new statetodos.actions.ts: all of the dispatch-able operations that can affect which shape our state takestodos.selectors.ts: slices of (memoized) state to reference across componentstodos.effects.ts: tasks performed when certain actions aredispatch()ed, also known as side effectstodos.facade.ts: an encapsulating service to be used from higher level modules, serving as the API into our state ( more or less)
To keep this post in a readable state no pun intended, I'll leave the gorey details for the reader to explore here. We'll save a more in-depth post on NgRx for a rainy day.
Nx provides NgRx state generators that come with NgRx Entity bolted in, but for our simple use case, we'll manually create our state files
Utilizing todos state
With our state in place, we're ready to wire everything up to our todos application and finally spit some todo items out
on the screen. In the name of keeping everything simple, we'll put our component logic in a single todos component
that we'll house within our shared pages library to open ourselves up for reusability later on. Using Nx, let's
generate a component:
nx g @nrwl/angular:component todos --project shared-ui-pages
Using Nx, we can generate Angular components in a manner similar to the Angular CLI, with the added benefit of targeting
component generation for specified apps and libraries. In our todos.component.ts, let's utilize our todos state logic
to start loading in todos:
todos.component.ts
import { Component, OnInit } from '@angular/core';
import { SettingsFacade } from '@exploring-nx/shared/features/settings';
import { TodosFacade } from '@exploring-nx/shared/features/todos';

@Component({
    selector: 'exploring-nx-todos',
    templateUrl: './todos.component.html',
})
export class TodosComponent implements OnInit {
    loading$ = this.todosFacade.loading$;
    todos$ = this.todosFacade.availableTodos$;

    constructor(
        private todosFacade: TodosFacade,
        private settingsFacade: SettingsFacade,
    ) {}

    ngOnInit() {
        this.settingsFacade.loadSettings();
    }

    onLoadClicked() {
        this.todosFacade.loadTodos();
    }
}
Since we've already wired up our state module as a dependency to the pages library (see shared-ui-pages.module.ts),
we shouldn't have any errors during runtime. With our code behind done, let's add some markup:
todos.component.html
<div class="flex min-h-screen flex-col items-center justify-center">
    <p class="pb-4">Loading: {{ loading$ | async }}</p>
    <button
        type="button"
        (click)="onLoadClicked()"
        class="inline-flex items-center rounded-md bg-indigo-600 px-6 py-3 text-white hover:bg-indigo-700"
    >
        Load todos
    </button>

    <div class="-my-2 overflow-x-auto sm:-mx-6 lg:-mx-8">
        <div class="inline-block min-w-full py-2 align-middle sm:px-6 lg:px-8">
            <div
                class="overflow-hidden border-b border-gray-200 shadow sm:rounded-lg"
            >
                <exploring-nx-todos-list
                    [todos]="(todos$ | async) ?? []"
                ></exploring-nx-todos-list>
            </div>
        </div>
    </div>
</div>
Our todos page component takes on the responsibility of loading in todos once a user has clicked the Tailwind-styled
button. We also have another feature responsible for dealing with application-wide settings (think environment names,
base URLs, dark mode enabled, etc.). I'll again spare the reader and leave a link to the
implementation here.
The settings library is yet another NgRx-based state lib that serves as nothing more than an additional state slice as
we'll see in our Redux Devtools when the application is running.
We'll add a few more components to keep things bite size and avoid component bloat:
# Generates a wrapper component that will consume todos into a table
nx g @nrwl/angular:component todos-list --project shared-ui-pages

# Generates a component that will take in todo items output on the wrapping table component
nx g @nrwl/angular:component todos-list-item --project shared-ui-pages
In our todos-list component, let's add the following:
todos.component.ts
import { Component, HostBinding, Input } from '@angular/core';
import { Todo } from '@exploring-nx/shared/models';

@Component({
    selector: 'exploring-nx-todos-list',
    templateUrl: './todos-list.component.html',
})
export class TodosListComponent {
    @HostBinding('class') class = 'pt-6 flex flex-col';
    @Input() todos: Todo[] = [];
}
Next, the markup:
todos-list.component-html
<table class="min-w-full divide-y divide-gray-200">
    <thead class="bg-gray-50">
        <tr>
            <th
                scope="col"
                class="px-6 py-3 text-left text-xs font-medium uppercase tracking-wider text-gray-500"
            >
                ID
            </th>
            <th
                scope="col"
                class="px-6 py-3 text-left text-xs font-medium uppercase tracking-wider text-gray-500"
            >
                Title
            </th>
            <th
                scope="col"
                class="px-6 py-3 text-left text-xs font-medium uppercase tracking-wider text-gray-500"
            >
                User ID
            </th>
            <th
                scope="col"
                class="px-6 py-3 text-left text-xs font-medium uppercase tracking-wider text-gray-500"
            >
                Completed
            </th>
            <th scope="col" class="relative px-6 py-3">
                <span class="sr-only">Edit</span>
            </th>
        </tr>
    </thead>
    <tbody class="divide-y divide-gray-200 bg-white">
        <tr
            *ngFor="let todo of todos"
            exploring-nx-todos-list-item
            [todo]="todo"
        ></tr>
    </tbody>
</table>
As we mentioned earlier, pages wire together components which we treat as simple consumers of data - nothing more,
nothing less. With our todos page component responsible for initiating the loading of todos in state, our consuming
components take the todos as Input()s and render markup to display the data on the page. Keeping this separation
allows us to more easily test our components in isolation from page components, as they are solely pure components in
the sense of taking in information, and spitting out HTML on the other side. Our unit tests can be as simple as testing
with different inputs to see how our output is effected, with no service dependency mocking overhead!
Now for our todo-list-item component:
todos-list-item.component.ts
import { Component, Input } from '@angular/core';
import { Todo } from '@exploring-nx/shared/models';

@Component({
    // eslint-disable-next-line @angular-eslint/component-selector
    selector: '[exploring-nx-todos-list-item]',
    templateUrl: './todos-list-item.component.html',
})
export class TodosListItemComponent {
    @Input() todo?: Todo;
}
And the markup:
todos-list-item.component.html
<td class="whitespace-nowrap px-6 py-4 text-sm font-medium text-gray-900">
    {{ todo?.id }}
</td>
<td class="whitespace-nowrap px-6 py-4 text-sm text-gray-500">
    {{ todo?.title }}
</td>
<td class="whitespace-nowrap px-6 py-4 text-sm text-gray-500">
    {{ todo?.userId }}
</td>
<td class="whitespace-nowrap px-6 py-4 text-sm text-gray-500">
    <input
        type="checkbox"
        [defaultChecked]="todo?.completed"
        class="h-4 w-4 rounded text-indigo-600"
    />
</td>
One thing to note with our component structure here is that we're using a @HostBinding() in the wrapper component to
tell Angular what class the parent container element should have, and our todos-list-item similarly uses a component
selector to allow us to generate <tr> tags without containing elements generated by Angular. This is all done in the
name of HTML styling semantics for Tailwind to style our components correctly and is entirely optional, as certain
browser specs designate <table>s to have an expected structure (<tr>s expect <td>s as the only child element, for
instance).
Running apps locally
Now that we've cranked out all the necessary code to run our application, let's go ahead and spin it up so we can see what loading todos in action looks like. From your favorite command line, go ahead and run the following to boot up the Angular server for our todos app:
nx serve todos
and we should see the typical output that is displayed when running a similar ng serve command in a single project
Angular workspace. Once our application is finished building and served for the browser, go ahead and navigate
to localhost:4200 with your Redux Devtools open in the dev console. Live action demo:
We've got ourselves a working todo application built with Nx and composable shared libraries! Since we've built out our todos libraries in common form, any application we wish to write in the future has access to all of the code that powers our todos app - no code duplication required, and two entirely separate/independent applications coexisting in the same workspace. Pretty cool, huh?
In a later post, we'll explore adding multiple types of applications to an Nx repository reusing our todos code that we' ve written so far. Until next time, friends!